Signority Formulas
Available with: Advanced Team and Custom Plans
Formulas allow you to automatically populate a tag with a value based on the values of other tags in a document. They are limited to the prefillable text and number tags—tags that can be filled out by the document sender prior to sending out the document for signing—as well as text tags.
In Signority, there are three types of formulas you can create:
- Conditional Formula
Signority’s conditional formula tags let you set a tag’s value based on a condition. - Copy Formula
The Copy formula allows a tag to take on the value of another tag. - Sum Formula
The Sum formula allows a tag to take the value of the sum of the values of multiple tags.
Set up a Conditional Formula
- To start, create a new Document or Regular Template, upload your files, and add the necessary tags.
- Select the prefillable tag or text tag that you would like to create a formula for, open the settings by clicking on the tag to select it and click on the gear icon. The tags settings window will pop up, locate the line called “Saved Conditions” and click on the ellipsis button. A new popup window will appear where you will build your formula.
- In the pop-up, select the “Conditional” option from the formulas dropdown.

- Then next to “IF Tag”, select the tag that will be used for the condition.

- After that, select a comparison operator under “is” and a “value” to compare the tag’s value to.

- Finally, enter the text that the tag should take on if the condition is met.
- At the end, you will have something that looks like the following.
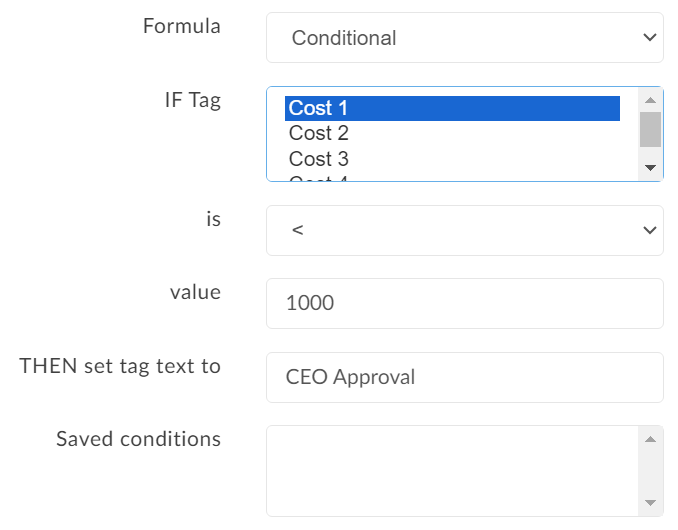 This conditional formula says: if the tag named “Cost 1” is greater than 1000, then set the tag to contain the text “CEO Approval”.
 - Once your formula is complete, click “+Add” at the bottom of the popup, then click “Save” to return to the tag’s settings. The condition line will now be marked as “Defined”.
Set up a Copy Formula
- To start, create a new Document or Regular Template, upload your files, and add the necessary tags.
- Select the prefillable tag or text tag that you would like to create a formula for, open the settings by clicking on the tag to select it and click on the gear icon. The tags settings window will pop up, locate the line called “Saved Conditions” and click on the ellipsis button. A new popup window will appear where you will build your formula.
- In the pop-up, select the “Copy” option from the list of formulas.

- Next to tag, choose the name of the tag you wish to copy the value from.
- Once your formula is complete, click “+Add” at the bottom of the popup, then click “Save” to return to the tag’s settings. The condition line will now be marked as “Defined”.
Set up a Sum Formula
- To start, create a new Document or Regular Template, upload your files, and add the necessary tags.
- Select the prefillable tag or text tag that you would like to create a formula for, open the settings by clicking on the tag to select it and click on the gear icon. The tags settings window will pop up, locate the line called “Saved Conditions” and click on the ellipsis button. A new popup window will appear where you will build your formula.
- In the pop-up, select the “Sum” option from the list of formulas.

- Next, to choose the tags to be included in the sum there are two ways you can do this:
- Use Shift + Click to select a range.
- Ctrl + Click (⌘Cmd + Click on Mac) to select a single tag in addition to other already selected tags.

- Once your formula is complete, click “+Add” at the bottom of the popup, then click “Save” to return to the tag’s settings. The condition line will now be marked as “Defined”.
How to Edit a Formula
To edit a condition, complete step 2 again and then select the formula you wish to edit and click “Modify at the bottom of the pop-up. Make the necessary changes and then click “Save”.
This feature is actively being enhanced. Stay tuned for more formulas in the future!