
Security Features You Need in an eSignature Platform
Your organization has decided to start using eSignatures and you have been tasked with researching the different options available in the marketplace. The first thing you have to do is research the basic security features you need in an eSignature platform. Then you can move on to the obvious, Price, Ease of use, Scalability, Reviews, and Features.
Why? Because you need to ensure all your documents and data is protected. You also have to ensure the signatures can be verified.
In order to ensure the integrity and veracity of the final document and signatures you need to be able to:
- Secure the document and signatures
- Verify the signer’s identities
- Protect any confidential information entered
- Track the document and signatories
- Restrict access
Here are the basic security features you need in an eSignature platform:
- Digital Signatures
- Masked Text
- Signer Identity Verification
- Multi-Factor Authentication (MFA) and Single Sign On (SSO)
- Audit Trail
- Team Account Roles & Permissions
The first security feature you need is a Digital Signature. Wait… what? I thought eSignatures are Digital Signatures. Aren’t they the same thing?
No, that is a common mistake many people make. And it is one that will determine the security of the document and signatures. Here are the definitions as quoted from the post eSignatures vs Digital Signatures
“An electronic signature is information in electronic form (can be sound, symbol, process, etc.) that is associated or attached to a document. This means that so long as we can demonstrate that the signature is associated with a person and that there was intent to sign, everything is legally binding and accepted (all of this can be seen in Signority’s audit trail).
A digital signature is actually a form of electronic signature that uses an encryption algorithm that helps validate who the signer is. It also ensures that the document cannot be tampered with, as the signature becomes invalid if the document is changed after signing. This helps prevent repudiation by the signer, making it almost impossible to deny having signed the signature. Essentially, these issues are some of the biggest challenges to electronic signatures, and digital signatures are able to help overcome these issues.”
For a much more comprehensive explanation from a cybersecurity perspective read this post about digital signatures on TechTarget.com.
Next is the Masked Tag. This tag allows you to protect your signatory’s personally identifiable information (PII) and other confidential information. If you work in the healthcare field for example, you may ask someone for their insurance information. You want to make sure that no one else sees this information.
Using a masked text tag will allow your signer to securely enter PII into the form where you request it. The masked tag will conceal and encrypt the information entered once the signer has filled it out. This means anyone who receives the document for signing after this signer will only see the title of the tag you entered, i.e.: Health Card.
Because the information is encrypted, the person who needs that information, the document sender, will have to follow very specific steps to retrieve that information securely and confidentially.
To help ensure the integrity of a signature you need a Signer Identity Verification feature. This feature will send a one-time use PIN code to the signer either by email or SMS (text message). They will need to have this code in order to access the document. Once they have used the PIN code to access the document an action will be logged. Using this code verifies the signer received it on an account that can be traced back to them. The log, or audit trail, will document that the signer’s identity has been verified and how it was verified.
And now that you have verified your signers identity, let’s look a little closer to home. You need to secure access to the eSignature platform. You don’t want just anyone having access to your clients, partners, and company’s information. To do this your organization can either set up Single Sign On (SSO) or a Multi-Factor Authentication (MFA) Login. These sign in methods help restrict access and lower instances of phishing and make it much more difficult for hackers.
As stated in this great explanation of SSO by TechTarget.com, “Single sign-on (SSO) is a session and user authentication service that permits a user to use one set of login credentials — for example, a name and password — to access multiple applications.” This ensures that unless someone can be verified through your companies main system, they cannot get in. The referenced article does a great job of explaining it.
If your company cannot use SSO then the application you select should, at the very least, offer MFA. As stated at precisely.com, “Multiple factor authentication verifies a user’s identity by combining two or more of the following independent credentials:
- Something the user knows (e.g.: password, PIN, passphrase)
- Something the user possesses (e.g.: email account, smartphone, code-generating device)
- Something inherent to the user (e.g.: fingerprint, iris scan, voice recognition)”
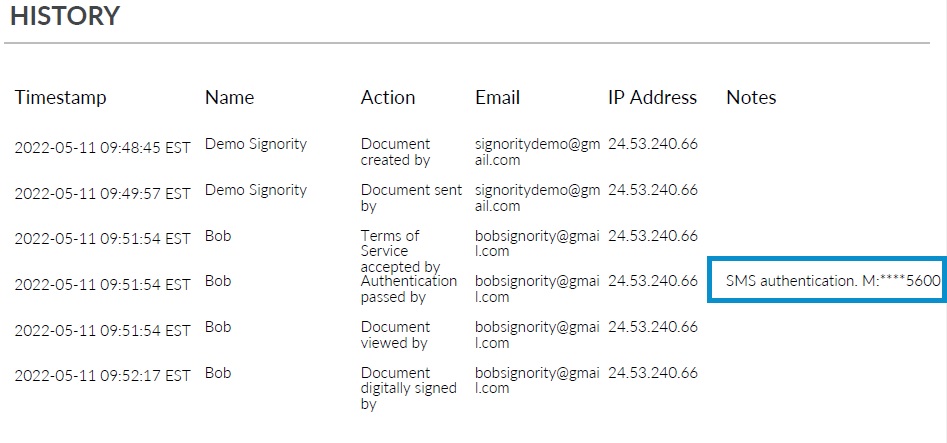
The Audit Trail is the next security feature we will review. The Audit Trail is a document that comes with your final copy of the signed document. It can be a part of the final document or arrive as a separate document. It has three main components: the meta data, the Signers, and the History. The audit trail will show you who did what action (signing the document), the timestamp associated with the action, their IP Address, and if required any notes. A note can include the ID Authentication method and include a partial email address or phone number. An example confirming SMS ID Authentication in an Audit Trail can be seen in the image below.
Finally, you need to have the ability to set up team account roles and permissions. The ability to assign roles and permissions helps you keep your documents secure by restricting who has access to what and when. For a clearer understanding of how roles and permissions may be set up you can review the roles available in Signority. You don’t want everyone in your organization being able to view the documents sent by legal or finance, do you?
Here is a bonus feature. The Retention feature. Depending on the industry you work in your organization may be required to have a retention policy. If you are unsure whether you need a retention policy I strongly encourage you to do some research to find out. Interdyn has a great article called Data Retention Policy 101 that reviews what a retention policy is, the questions you need to ask, and how to set one up. I highly recommend you read this if you do not have a policy in place.
A retention feature allows you to apply your retention policy to all the documents that have been signed digitally. And a good one will allow give you ways to automate the whole process. This post gives a good overview of a retention feature and the options available within one. You will see it is easy to set up and helps you ensure compliance.
And those are the basic security features you need in an eSignature platform.
Look out for next weeks edition where I will review the differences between Adobe Signature and Signority eSignatures in the post, “Adobe vs Signority“.
Until then, have a great week and stay safe.
Security Features You Need in an eSignature Platform
Your organization has decided to start using eSignatures and you have been tasked with researching the different options available in the marketplace. The first thing you have to do is research the basic security features you need in an eSignature platform. Then you can move on to the obvious, Price, Ease of use, Scalability, Reviews, and Features.
Why? Because you need to ensure all your documents and data is protected. You also have to ensure the signatures can be verified.
In order to ensure the integrity and veracity of the final document and signatures you need to be able to:
- Secure the document and signatures
- Verify the signer’s identities
- Protect any confidential information entered
- Track the document and signatories
- Restrict access
Here are the basic security features you need in an eSignature platform:
- Digital Signatures
- Masked Text
- Signer Identity Verification
- Multi-Factor Authentication (MFA) and Single Sign On (SSO)
- Audit Trail
- Team Account Roles & Permissions
The first security feature you need is a Digital Signature. Wait… what? I thought eSignatures are Digital Signatures. Aren’t they the same thing?
No, that is a common mistake many people make. And it is one that will determine the security of the document and signatures. Here are the definitions as quoted from the post eSignatures vs Digital Signatures
“An electronic signature is information in electronic form (can be sound, symbol, process, etc.) that is associated or attached to a document. This means that so long as we can demonstrate that the signature is associated with a person and that there was intent to sign, everything is legally binding and accepted (all of this can be seen in Signority’s audit trail).
A digital signature is actually a form of electronic signature that uses an encryption algorithm that helps validate who the signer is. It also ensures that the document cannot be tampered with, as the signature becomes invalid if the document is changed after signing. This helps prevent repudiation by the signer, making it almost impossible to deny having signed the signature. Essentially, these issues are some of the biggest challenges to electronic signatures, and digital signatures are able to help overcome these issues.”
For a much more comprehensive explanation from a cybersecurity perspective read this post about digital signatures on TechTarget.com.
Next is the Masked Tag. This tag allows you to protect your signatory’s personally identifiable information (PII) and other confidential information. If you work in the healthcare field for example, you may ask someone for their insurance information. You want to make sure that no one else sees this information.
Using a masked text tag will allow your signer to securely enter PII into the form where you request it. The masked tag will conceal and encrypt the information entered once the signer has filled it out. This means anyone who receives the document for signing after this signer will only see the title of the tag you entered, i.e.: Health Card.
Because the information is encrypted, the person who needs that information, the document sender, will have to follow very specific steps to retrieve that information securely and confidentially.
To help ensure the integrity of a signature you need a Signer Identity Verification feature. This feature will send a one-time use PIN code to the signer either by email or SMS (text message). They will need to have this code in order to access the document. Once they have used the PIN code to access the document an action will be logged. Using this code verifies the signer received it on an account that can be traced back to them. The log, or audit trail, will document that the signer’s identity has been verified and how it was verified.
And now that you have verified your signers identity, let’s look a little closer to home. You need to secure access to the eSignature platform. You don’t want just anyone having access to your clients, partners, and company’s information. To do this your organization can either set up Single Sign On (SSO) or a Multi-Factor Authentication (MFA) Login. These sign in methods help restrict access and lower instances of phishing and make it much more difficult for hackers.
As stated in this great explanation of SSO by TechTarget.com, “Single sign-on (SSO) is a session and user authentication service that permits a user to use one set of login credentials — for example, a name and password — to access multiple applications.” This ensures that unless someone can be verified through your companies main system, they cannot get in. The referenced article does a great job of explaining it.
If your company cannot use SSO then the application you select should, at the very least, offer MFA. As stated at precisely.com, “Multiple factor authentication verifies a user’s identity by combining two or more of the following independent credentials:
- Something the user knows (e.g.: password, PIN, passphrase)
- Something the user possesses (e.g.: email account, smartphone, code-generating device)
- Something inherent to the user (e.g.: fingerprint, iris scan, voice recognition)”
The Audit Trail is the next security feature we will review. The Audit Trail is a document that comes with your final copy of the signed document. It can be a part of the final document or arrive as a separate document. It has three main components: the meta data, the Signers, and the History. The audit trail will show you who did what action (signing the document), the timestamp associated with the action, their IP Address, and if required any notes. A note can include the ID Authentication method and include a partial email address or phone number. An example confirming SMS ID Authentication in an Audit Trail can be seen in the image below.
Finally, you need to have the ability to set up team account roles and permissions. The ability to assign roles and permissions helps you keep your documents secure by restricting who has access to what and when. For a clearer understanding of how roles and permissions may be set up you can review the roles available in Signority. You don’t want everyone in your organization being able to view the documents sent by legal or finance, do you?
Here is a bonus feature. The Retention feature. Depending on the industry you work in your organization may be required to have a retention policy. If you are unsure whether you need a retention policy I strongly encourage you to do some research to find out. Interdyn has a great article called Data Retention Policy 101 that reviews what a retention policy is, the questions you need to ask, and how to set one up. I highly recommend you read this if you do not have a policy in place.
A retention feature allows you to apply your retention policy to all the documents that have been signed digitally. And a good one will allow give you ways to automate the whole process. This post gives a good overview of a retention feature and the options available within one. You will see it is easy to set up and helps you ensure compliance.
And those are the basic security features you need in an eSignature platform.
Look out for next weeks edition where I will review the differences between Adobe Signature and Signority eSignatures in the post, “Adobe vs Signority“.
Until then, have a great week and stay safe.