Submit a Support Ticket


NOTE: Once you complete the first step you will be taken to our parent company site FileCloud.com.  We have combined our support tracking into one platform for efficiencies.

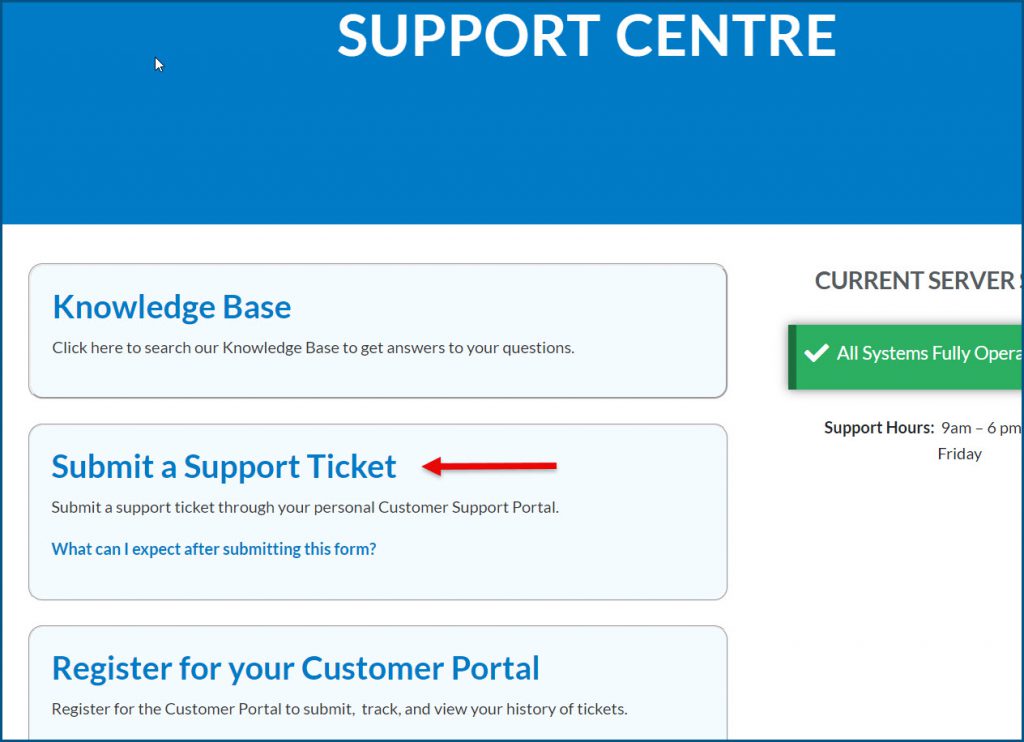
1. Go to the Signority Support Centre and click on Submit a Support Ticket.

Submit a Support Ticket

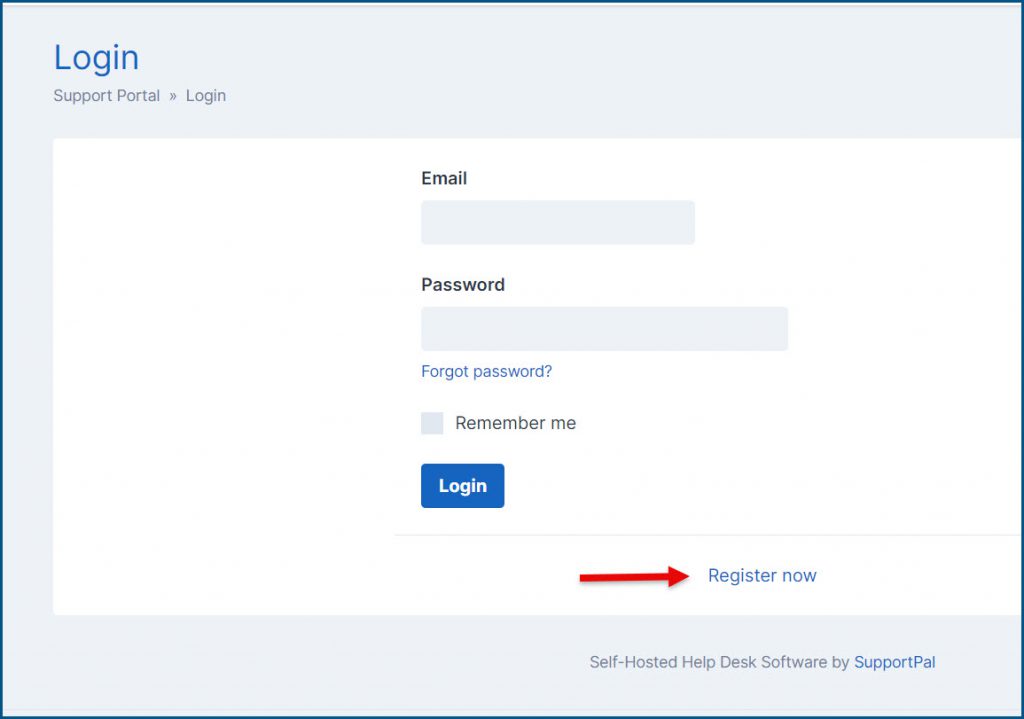
2. Login to the Portal, or click Register at the bottom if you haven’t created an account already.

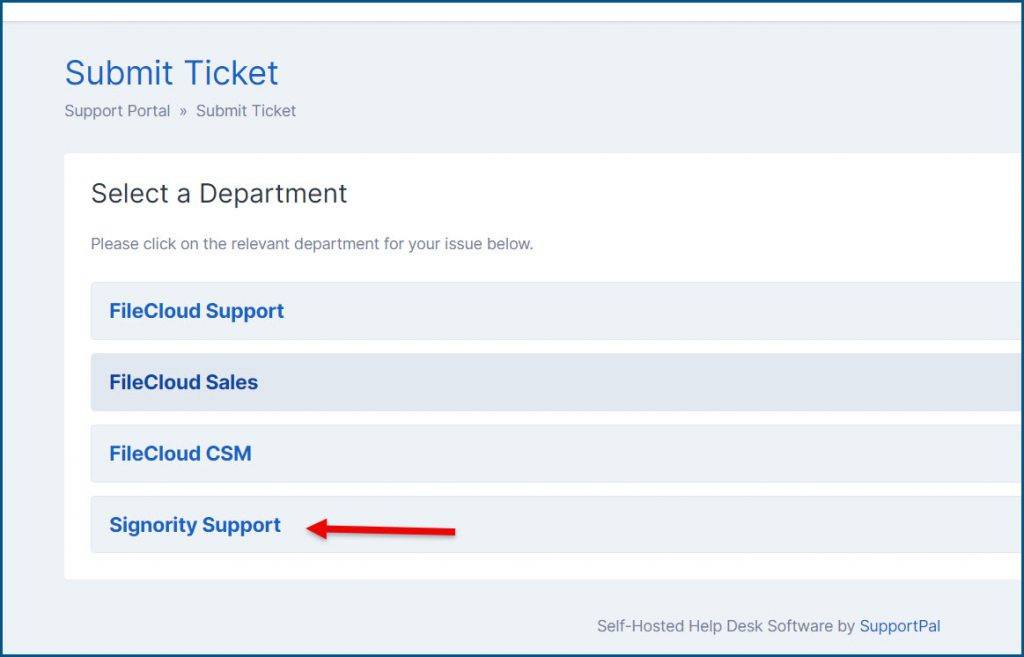
3. Once you are logged in and ready to submit your ticket request choose the Signority Support option.

Signority Support Option

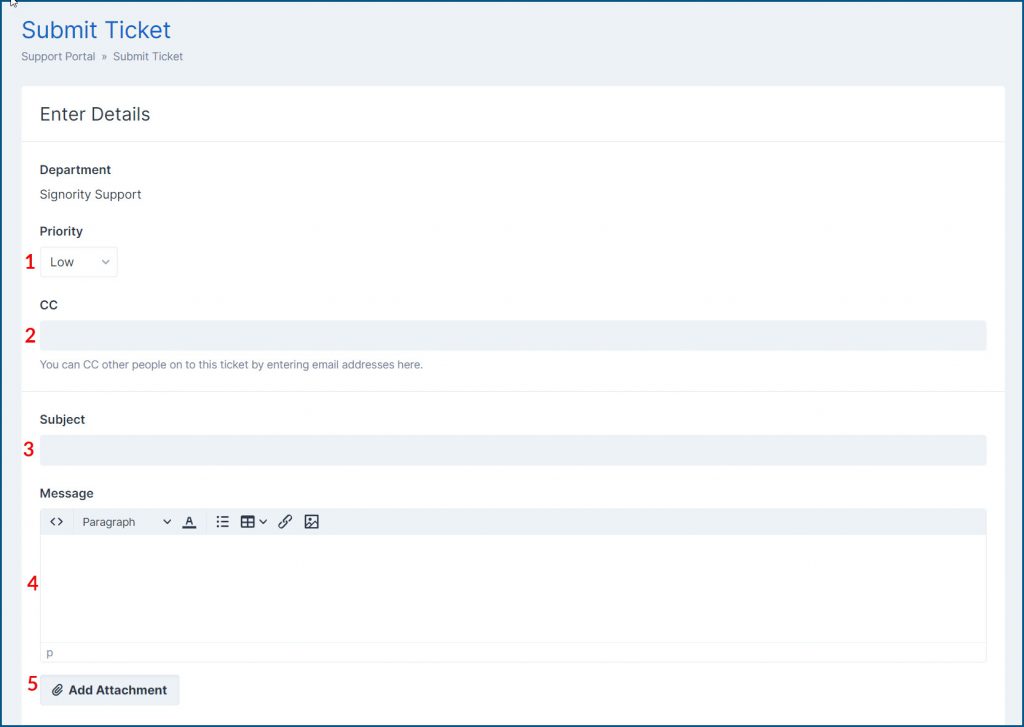
4. The first part of the form is all about your ticket and the issue you need resolving.  As you can see below you will need to fill out:

  1. The Priority of the issue: Low, Normal, High, Critical (Critical is reserved for when the site is down)
  2. CC: Do you want to cc anyone on the ticket communications
  3. Subject: What the ticket is about
  4. Message: Please give as much detail as possible.
  5. Add Attachment: Please attach any screenshots of the error or issue if you can.

Top Ticket Section

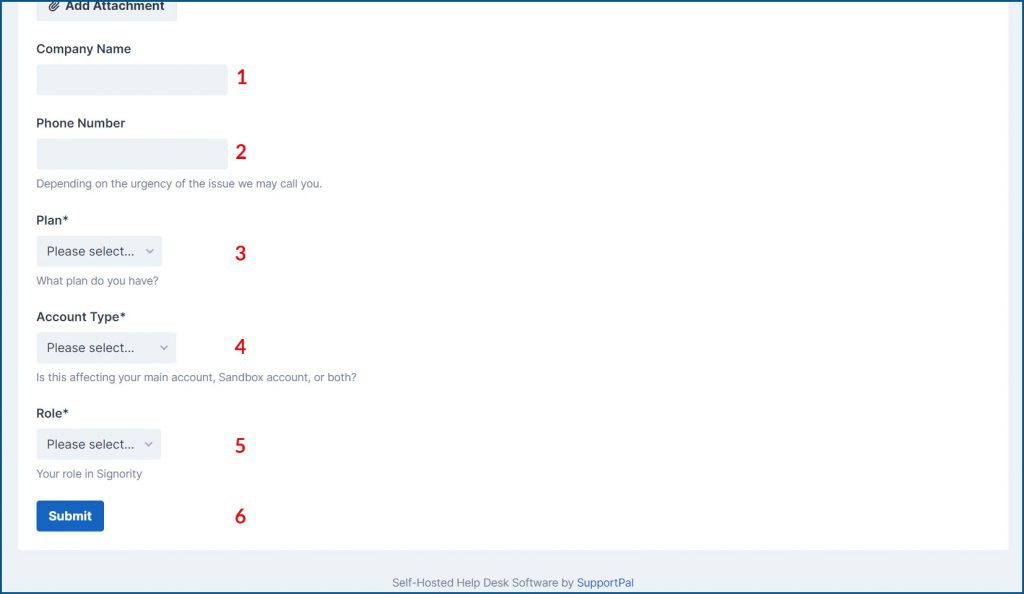
5. In the bottom section we ask for information that allows us to know:

  1. Company Name: The organization you are with (optional for individual accounts)
  2. Phone Number: Where we can reach you if we need more information and it’s time sensitive.
  3. Plan: What plan you are on. (If you are a regular user you may need to ask an Admin.)
  4. Account Type: Is the issue affecting your main account (used for business), sandbox account (testing), or both?
  5. Your Role: Are you a Team Billing Admin, Super Admin, Team Admin, Doc Admin, or Regular User (this can be found on your Dashboard in the top with the subscription information – if you do not see it, you are a Regular User)
  6. Submit: Once you have filled in all the required information click this button to submit the ticket. You will then receive an email confirming your ticket has been received along with the ticket number.

Bottom Ticket Section

Register for Customer Support Portal


There are two places you can get to the registration page from:

  1. Signority’s Support Centre pageRegister from Support Centre
  2. Submit a Ticket page (if you accidently clicked Submit a Support Ticket before registering) 

Register from Portal Login page

When you arrive at the registration page you will be asked for the following information:

  • First Name and Last Name
  • Email address
  • A Password and then to confirm the password
  • Phone number
  • What Country you are in.
  • Your Timezone
  • The Organization name (optional if you are not part of an organizations plan)
  • License Keyyou can ignore this if you do not have the FileCloud service.

Once you have filled in all the fields, click the blue Register button.

Set Authentication Code Expiration Period


Available Plans: All               Roles: Billing and Super Admins  

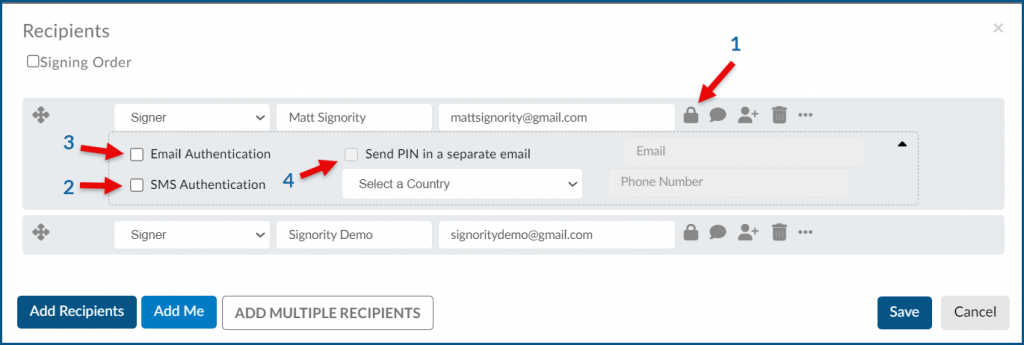
 When you set that a recipient must enter a one-time authentication code to access the document you can now set how long that code is valid for.  

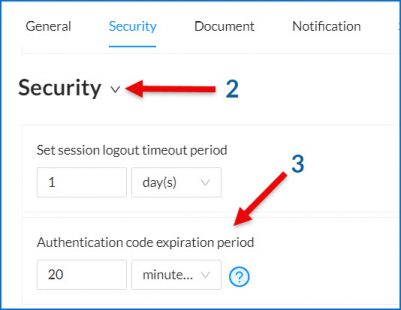
 To set the expiration time: 

  1. Go to Admin >> Settings >> Global Settings 
  1. In the Global Settings menu select Security 
  1. Go to Authentication code expiration period and choose the timing of your choice. You may set it using minutes, hours, or days. 

One-time authentication code settings


Activating Signature Tag Timestamp

  1. Once you place your Signature tag on to the document, click the tag once to have the menu bar appear and then select the Gear icon.
  2. Once the Actions box appears:
    1. Check the Regulatory Information box 
    2. Click on Save 
  3. Your Signature Tag should now show the placeholders for the Signers name, time and date, and the document ID number.

Signature Tag Feature Overview


This article will review the different features that are available to the Signature Tag. 

The Signature is used to capture the signature of your recipients on a document.  A signature may be submitted by the recipient by uploading and image, typing a signature, or drawing a signature using a finger or stylus.  

 The tag, seen in the image below, when clicked on will have a menu will three icons appear on top and three dots on the bottom right of the tag. 

Signature Tag Overview1. X: will delete the tag

2. Gear: will open the advanced features window

3. Recipient Drop Down Menu: Allows you to change the recipient the tag is assigned to

4. Three Dots: Click your mouse on these dots, hold, and drag your mouse to resize the tag.


In the Advanced Features modal window that pops up you will find the following options:

Signature Tag Overview numbered

  1. Name: Give the tag a name to identify it, this is helpful if you export the document data.  
  2. Saved Conditions: If applicable this allows you to set conditions on when, how, or if the tag is used. Currently there is no condition that uses the Signature tag. 
  3. Required: Check this box to make the tag Required for mandatory signing.  
  4. IF: This dropdown menu will list all the checkboxes in the document and allow you to make the Signature Tag mandatory, or optional, depending on your selection. 
  5. Regulatory Information: Checking this box will apply a timestamp and GUID information appear underneath the signature. 


Template Settings: Signer View (Signer Options)

Available with: All Plans                   Available to: All Users


To update Template settings:

  1. Go to your Templates Folder
  2. Select the type of Template you want to update (regular, template link, bulk sign)
  3. Click on the name of the template you want to update
  4.  

  5. In the template’s document design page click on Edit beside Settings in the lefthand sidebar menu
    Template settings Edit
  6.  

  7. In the window that pops up, go to the settings you want to update, I’ve chosen Signer Views in the example below. If a setting you wish to update is locked, as is the case with the Hide Download Button option below, you will have to ask an Admin to unlock it for you.
    Template Settings Signer Views
  8.  

  9. Once the option has been unlocked update the setting and then click Save as seen below.
    Template settings Updated and saved
  10.  

  11. Once you have completed this task in all the Templates you need to update ask the Admin to relock any settings they had unlocked for you in the process.


Why did the font change in my document?


Have you ever sent a document for signing only to have it come back with mismatched fonts, or a different font than you created the document in?

Signority has 2 fonts embedded within it for rendering your document; Arial and Times New Roman

If you are looking to ensure your document stays in the font you have used for consistency we recommend that you embed custom fonts into your document.  Microsoft has some tutorials on how to accomplish this, just choose the right environment for you:

Windows environment  or  macOS


Delete All My Documents


Plan: All                           Users: All

This tutorial reviews how to delete all the documents within your account. 

Note: A Bulk Delete feature is coming in 2024

If the documents have already been exported or you do not need to keep any copies you can delete the documents in the account by:

  1. Going into the Documents Folder
  2. Updating the number of documents per page to 30
    Increase documents on page

  3. Check the box beside Document Title (1) to select All Documents and click Delete (2).
    Select Documents

  4. Do this until all the documents have been deleted.


Enable Delegate Signers


Available with: Custom Plan                             Users: All

Delegate signers are pivotal in managing and signing transactions on behalf of an account. This tutorial will guide you through enabling delegate signing, adding a delegate signer, configuring settings, and removing a delegate signer.

Note: Delegate signers can be other users from the same organization (account). It is not restricted to your team.

Enable Delegate Signing

Delegate signing can be enabled across all teams in Global Settings by the Billing Admin or a Super Admin.

To enable Delegate Signing for your organization:

  1. Navigate to either Global Settings in your Admin Console
  2. Under Signer Options (at the bottom), select “Allow users to delegate signing authority

Enable Delegate Signing Authority

Your users can now delegate others within our organization to sign documents on their behalf.

Click here to learn how to Manage Delegate Signers.

Team Settings: Signer Options


Available with: All Team Plans     Role: Billing Admin, Super Admin, Team Admin 

Signer Options allows an organization to determine what, if any, restrictions signers have when signing a document. These are in both Global and Team settings. You can make them a default or enforce (lock) the settings.

Signer Options  are found in both Global and Team settings.  By enabling or disabling each option you allow or restrict what a signer can, or cannot, do when signing a document. Below is an image of the Signer Options from Team Settings. 

When the slider button to the left of the option is on the left and gray the option is visible to the signer.  If the button is on the right with a blue background, then the option is hidden from the signer.

Team Settings Signer Options

Let’s review what each of these options restrict a signer from being able to do if enabled.

Hide Reject Button

This option will hide the Reject option. This option allows the signer to reject, this action will let you know that they have decided not to sign the document.  

Hide Change Signer Button

Change Signer allows the signer to do exactly what it says, it allows them to reassign their tags in the document to another signer, i.e.: A husband may change it so that his wife will sign the document.  At this time Signority will ask for her name and email address to forward the document. 

Hide Save Button

If the Hide save button option is enabled, the recipient will not have the ability to save their progress as they are undergoing the signing process, and will have to either fill out the entirety of a form in one session or start over the next time they access the document.

Hide Download Button 

Upon selecting the Hide download button option, the signer will not have the option to download the document that they are currently signing.

Hide View Document Button

When the Hide view document button option is picked, the signer will not be able to see the document again after they have signed it.

Hide Status Button

If the Hide status button option is selected, the signer will  be unable to view the document’s ID, GUID, name, Creation date, Expiry date, Recipient list, and history while information about whether or not other recipients have signed will also be unavailable.

Hide Thumbnail

If the Hide thumbnail option is selected, the signer will no longer see the thumbnail summary showing how many pages there are in each file that makes up the document.

Hide Help Button

If the Hide help button option is selected, the signer will no longer see the help button located at the bottom right side of the page.

Hide Draw Signature Option

This will hide the Draw tab on the Signature box when they click to sign the document, preventing them from using their finger or stylus to apply their signature.

Hide Type Signature Option

This will hide the Type tab on the Signature box when they click to sign the document, preventing them from typing their signature.

Hide Upload Signature Option

This will hide the Upload tab on the Signature box when they click to sign the document, preventing them from uploading an image of their signature to use to sign the document.

Allow Users to Delegate Signing Authority

When enabled this option allows users to designate a member from their own team to sign a document on their behalf.  This option is particularly useful when a user is going on vacation and has time sensitive documents out for signing. You can read how to delegate a signer here.