Electronic Signature Authentication Using Email & SMS

When email/SMS password authentication is turned on, Signority will send a randomly generated PIN to the recipient when they try to access your document. This helps with the electronic signature authentication process, further validating the signer and helps you determine that the signer’s identity is valid.

Setting up Multifactor Signature Authentication

To turn on a two-factor verification type for a recipient when you’re sending a document, you’ll go through the same process for creating electronic signature documents for othersUpload the document you want to use and then go to the Recipients page to add your signers.

  1. Use the Add Recipients button to add the signers you want.
  2. For the signers you wish to authenticate, click the lock icon to set up signature authentication.

  1. Choose the verification type you’d like for the recipient. You have the option between Email Authentication and SMS Authentication. For SMS Authentication, you will need the signer’s cell phone number for them to receive the PIN code. (Note: please ensure the SMS number is correct, or the signer cannot access the document for signing.)
    For Email Authentication, you have the choice to send the PIN to a separate email address. Just check off the check box “Send PIN in a separate email”, and type in an email address that the recipient also owns.
  1. Once you have added the authentication settings, finish your signer list, set any Recipient Settings you need and edit your invitation email and go to the Editor page.
  2. Complete the document preparation by adding Tags to your document. When you’re finished, use the Next button on the top right to send off the document.
  3. For security reason, the PIN code will be displayed from the sender’s status after the SMS PIN code is sent. The sender can inform the designated recipient in case the recipient couldn’t receive the PIN code for any reason.   

Electronic Signature Authentication Process for Signers

For the signers, once they’ve clicked on the link from the invitation email, they will be shown this access page. The Email PIN code will be sent immediately in an email separate from the email invitation, and depending on which setting you chose, may be in an email sent to another email address that the recipient owns. SMS PIN codes will also be sent at the moment the signer clicks the Review Document button in the invitation email.
The signers will require either (or both) of these PIN codes to access the document before signing.
Signature Authentication PIN Codes required
Once the signer has accessed the page, the process to sign documents online will be the same as usual.

Document Audit Trail

Authentication methods are captured in the document audit trail. Only the last 4 digits of the phone number is shown for privacy reason.

Further Readings

Benefits of Digital Signatures
Whitepaper: A Brief Introduction to eSignatures
Track and Monitor Document Status & Workflow

Recipient Witness Signing

For signers, you may receive a document that requires a witness signing. In these situations, the witness signer must be with you in person at the time of the signing. How they go about signing the document is very similar to how a regular recipient signer would sign. However, since the person sending the document does not know the identity of the witness, an authentication process is necessary to validate the witness signer.
To do this, simply go through the signing process as you normally would, with the witness signing first. The witness can enter all of the information in tags besides the signature tag. Once they’re ready to sign, click on the signature tag.
witness signer tags

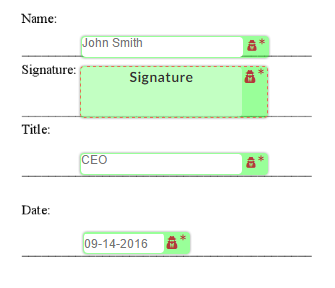
Step-by-Step on Completing Witness Signing Authentication

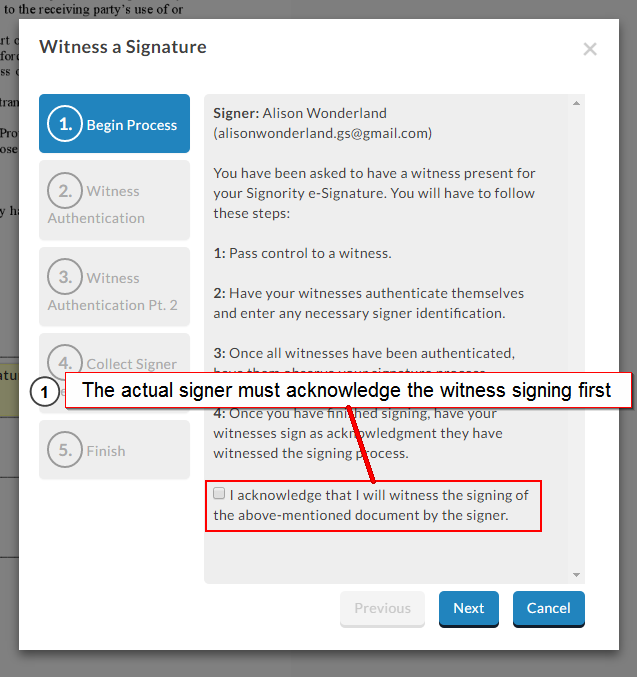
When selecting the witness signature tag, they will be prompted for the authentication process, similar to the In-Person Signer authentication. The first step will be for the witness to acknowledge that they will be signing as the specified signer’s witness. Simply check the acknowledgement and move on to the next step.
witness signing acknowledgement
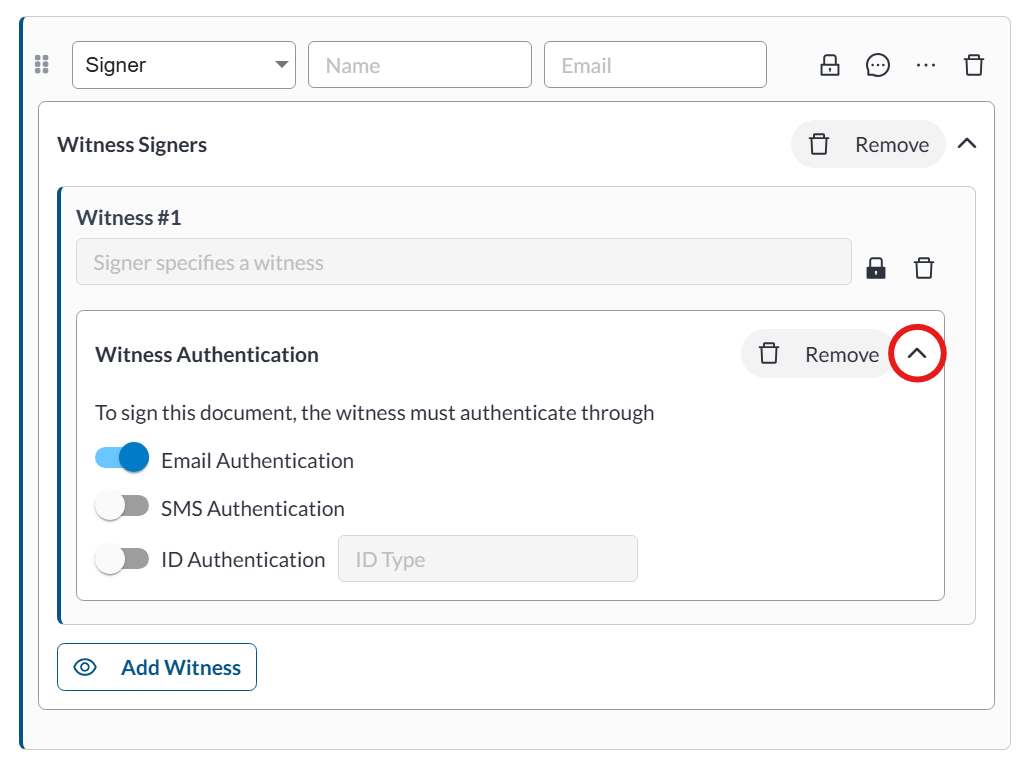
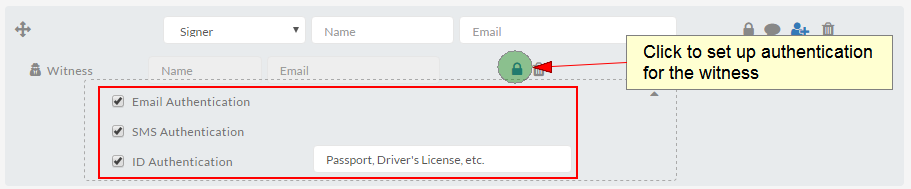
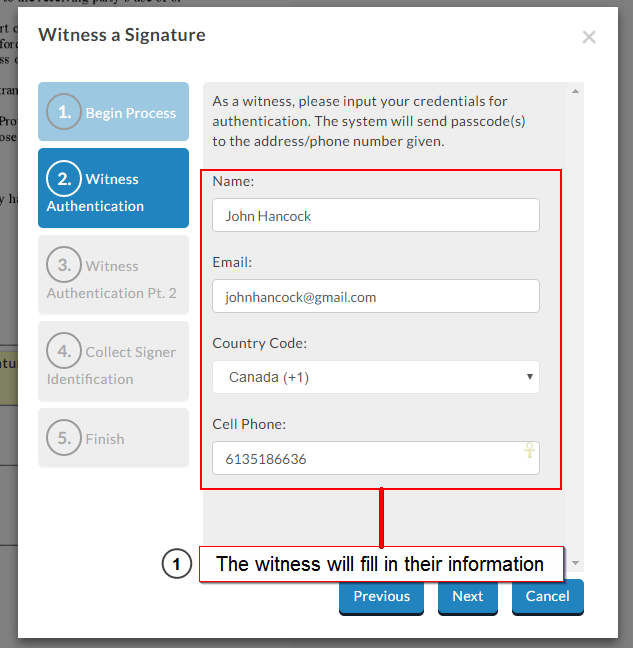
Next, the witness will need to fill in their information. Enter the name and email. Cell phone details will only be needed if SMS authentication was selected for the witness signing.
witness signing details for authentication
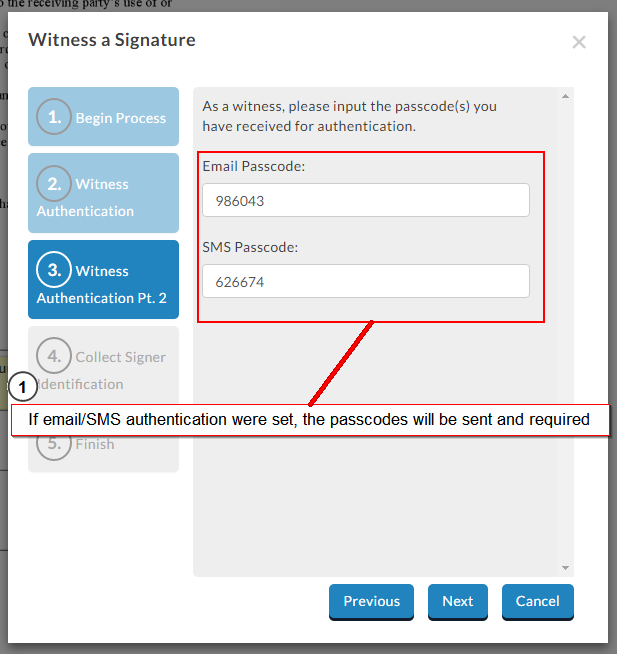
If either the email and/or SMS authentication method were set, you’ll need to enter a passcode that you received. The passcodes will be sent in Step 3 to the email and cell phone number provided in the previous step. Once the passcodes are received and inputted, you can continue.
witness signing authentication factors
If an ID authentication was used, the witness will be required to input the information specified by the sender. The ID will usually be a government-issued document, such as a Driver’s License or Passport Number, but can also be anything that proves and validates the witness’ identity. This information will be captured in the audit trail as proof of identity for the witness.
witness signing identification authentication
Once the steps above are completed, you can click Finished and when the page reloads, the signature tag will be accessible for signing. Signing will be the same as for a regular signer, they will have access to the draw, type, or upload options when adding their signature. When they finish signing, simply hand control back over to the original signer and they can complete the signing process.

Further Reading

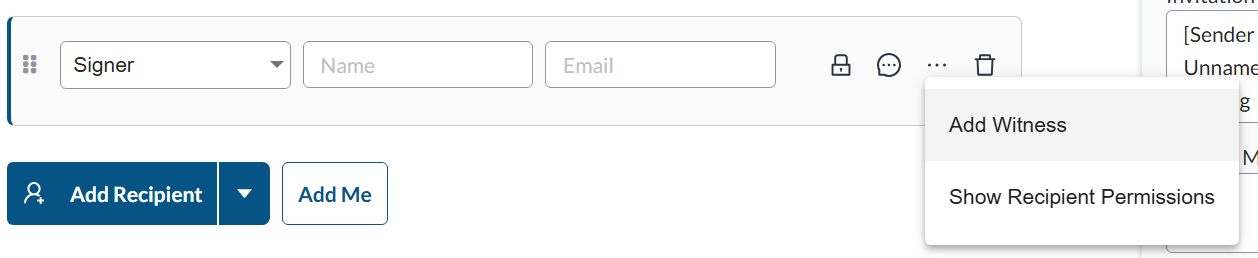
Prepare a Document for a Witness Signer
Electronic Signature Authentication with SMS and Email
Rejecting Documents as the Signer

Setting Up Documents with Witness Signers

When adding a recipient, you have the option to require a witness for their signature. A witness signer is assigned their own tags within the same document but is linked to a specific recipient and must be physically present with them during signing — they access and sign the document at the same time and in the same location. If you need a refresher on creating a document, visit our guide on creating a document before getting started.

Are you a witness signer? Check out our guide on signing as a witness to see what the experience looks like from the signer’s side.

Adding a Witness Signer

A witness signer can be added in two places:

  1. On the Recipients page when creating a new document
  2. In the Recipients panel in the Document Editor, when editing an existing document or working on a template

Adding a Witness in the Recipients Page

  1. Start a New Document: Click +New button in the main header and select New Document.
  2. Upload the document(s) that requires a witness signer and then click Next to go to the recipients page.
  3. Add Recipients: Click Add Recipient until you’ve added all required signers, entering each person’s name and email address.
  4. Add a witness to a recipient: To the right of each recipient, you’ll see four icons. Click the ellipsis (···) icon — the third icon — and select Add Witness from the dropdown.
  5. A witness will then be added as a linked recipient beneath the signer. To add more than one witness, click the “Add Witness” button.
  6. Click Next when you’re done on the Recipients page.

Add or Edit a Witness in the Document Editor

  1. Select Edit next to the recipients section on the left panel.
  2. There are four icons to the right of a recipient, click the third (a person with a + symbol) icon next to the signer that needs a witness.linking witness signers with regular signers
  3. The witness signer’s name and email are unknown to the sender, so you must set up an authentication method by clicking on the Lock icon and select the authentication method you like: email, SMS, and/or ID. This allows you to validate their identity. Click ‘Next’ or ‘Design my documents’ when you’re done. Note that for ID authentication, you must specify what kind of ID information you want from the witness. 

    witness signers authentication options

Setting Up Witness Signer Authentication

Since the witness signer’s name and email are unknown to the sender at the time of setup, you’ll need to configure an authentication method to verify their identity. Email authentication is enabled by default but out can also enable SMS and/or ID authentication. To view and modify the settings authentication method, click the expand arrow beside the Remove button in the Witness Authentication panel.
witness signers authentication options

Note: If you select ID authentication, you’ll need to specify what type of ID information you want to collect from the witness.

Assigning Tags to a Witness

After adding your recipients, you can assign tags to them in the Editor. Unlike other recipients, witnesses are not listed in the standard Recipients list. To assign a tag to a witness:

  1. Select the tag you want to assign to a witness.
  2. In the tooltip that appears, open the recipient dropdown and select the witness.assigning tags to witness signers

Note: Tags assigned to a witness signer will display a distinct icon in the top-right corner of the tag to distinguish them from other recipients.

Once all tags are assigned, you can send the document for signature.

Further Reading

Validate Electronic Signatures with Email & SMS Authentication
Setup Documents for In-Person Signing
Benefits of Digital Signatures

Are Electronic Signatures Legally Binding?

Are electronic signatures legally binding? In a word: yes! The key with any signature is showing intent and approval of the document’s contents. Signority’s signatures are a completely legal way to sign electronic documents given that it can permanently mark an electronic document with your signature.
Any user of Signority can rest assured that electronic signatures are accepted in North America and globally.
 

Are Electronic Signatures Legally Binding in Canada?


Are Electronic Signature Legally Binding in Canada
In Canada, the government recognizes electronic signatures and the law views electronic and digital signatures as being valid unless another law states otherwise. In Canada, the Personal Information Protection and Electronic Documents Act (PIPEDA) must be consulted for further requirements as to specific types of documents, such as affidavits or government documents. Generally, however, Part II of PIPEDA takes care not to prohibit electronic signatures and gives a broad definition of how one can legally sign electronically. Some provinces have equally legislated in the area of electronic signatures, such as Ontario’s Electronic Commerce Act, which recognizes that electronic signatures fulfil any legal requirements for signing general documents.

What About the US?

Are Electronic Signatures Legally Binding in the US
In the United-States, the Electronic Signatures in Global and National Commerce Act (E-Sign Act) and the Uniform Electronic Transaction Act (UETA) make electronic signatures legally binding and prohibits the States from imposing restrictions on the technology used to sign electronically as of 2000. Both ESIGN and UETA deem electronic records and signatures to hold equal weight to traditional paper contracts and handwritten signatures. As we explained in the Benefits of Digital Signature page, as long as the intent to sign is captured electronically, the electronic signature is valid.
UETA and ESIGN also specify that electronically signed documents record specific information about the signing process. The document needs to reflect the process of how the signature was created or add some kind of proof of electronic signature use to the document. These are done with audit trails that show the document history, signature and signer information, and helps validate the signer’s identity.

Further Reading

Benefits of eSignatures
Electronic Signature vs. Digital Signature
The Anatomy of an Audit Trail
Electronic Signatures & the ESIGN Act

Benefits of Digital Signatures

You may have heard the term digital signature thrown around frequently and many consider it synonymous with electronic signature. In this post, we’ll go over the benefits of digital signatures and touch on how they differ to help you decide which is the best option for you!

What is an Electronic Signature?

First, by definition, an electronic signature is simply information in electronic form that captures the intent of a signer. This means that the “signature” can be in the form of a symbol, typed text, or even image or sound, as long as the intention is present and captured. By law, this will make the signature and document legally-binding and accepted. Therefore, if the person’s association and intent are both demonstrated in the signature, then the document is legally accepted. The person’s association and intent are both captured in the audit trail. For more information about the audit trail, check out our blog post on the anatomy of an audit trail. You can learn more about electronic signatures in our whitepaper “A Brief Introduction to eSignatures“.

What is a Digital Signature?

So how is a digital signature any different from an electronic signature? Well, technically, a digital signature is a form of electronic signature that further improves the security and authentication of the signature.
Digital Signatures work as an extra protective layer on top of electronic signatures, rather than replacing them. When a document is digitally signed, a cryptographic operation binds an Adobe-verified digital certificate to the PDF file data, creating a unique digital “fingerprint”. The digital certificate and the unique fingerprint are what makes digital signatures so viable.
If you’d like a more technical breakdown of how digital signature technology works, check out our whitepaper on the breakdown of digital signature and its differences to eSignature.

In Signority, to use digital signatures on the documents you send out is simple. When you click on the “Send” button in the Document Editor, just choose the “Secure with Digital Signatures” option. When the document is signed by all your signers, a digital signature will be applied by Signority onto the finalized document.

Benefits of Digital Signatures

As a result of Digital Signatures, you can be assured of 3 things:

  1. Signer identity is valid – you will know that the signers are who they say they are
  2. Tamper-proofing – you can be ensured that the document hasn’t been tampered with, otherwise, the signature would be invalidated
  3. Non-repudiation – the signer cannot deny having signed the signature and it is possible to prove intent in court

This is shown through the final PDF document that comes from Signority. When you open a document with a digital signature in a PDF reader, you will typically see a message that verifies and authenticates the signing process. For example, all versions of Adobe Reader will automatically verify a digital signature on a document. If the digital signature is valid, then a blue banner with a green check-mark will appear at the top.

If the document is ever tampered with, with either Photoshop or a text editor, you will notice a warning sign when you open the document in a PDF reader like the one shown below.

You may also get a warning sign with a red ‘x’ like the one below saying that the certification is invalid.
tampered documents will have broken banners highlight benefits of digital signatures

In both cases, you should take the precaution to check the contents of the document, since they could be compromised.

Clicking the Signature Panel button on the right of the banner in Adobe Reader brings up further details about the signing process. You’ll see a sidebar appear with the following information shown for the signature. You can see that it gives plenty of information on the signing process, such as the validity of the signer identity, the timestamp, etc. Clicking on the Certificate Details… will also bring further information, including the public and private keys used to encrypt the document.
benefits of digital signatures - signature validation
You can see the benefits of digital signatures already with the level of encryption information stored directly in the file. These documents will be secured forever regardless of what happens to the involved parties!
You can learn more about digital signatures and whether it’s best for you by checking out our whitepaper on the breakdown of electronic signature vs digital signature here.

Further Reading

Are Electronic Signatures Legally Binding?
The Breakdown: Electronic Signatures vs. Digital Signatures Blog post
Electronic Signature Authentication using Email and SMS

Bulk Send Documents for Signing

The Bulk Sign feature lets you easily bulk send documents for signing to up to 200 people simultaneously. Configure a Bulk Sign template once, and a copy will be sent to each person for signing automatically. Each document you send through Bulk Sign will show up in your document list, so you can track the progress for each recipient.

Creating Bulk Send Documents for Signing

To create a Bulk Sign template, click +New and then New Template. When prompted, select the Bulk Sign option.
Select to create a bulk send document for signing
Creating a Bulk Send document is the same as creating a Document for electronic signature, except that you’ll add recipients very differently. Like the other template options, you will be taken directly to the Editor page. For this workflow, you will need:

  • A CSV file to import your signer list
  • The names and emails of all of your signers

Bulk send documents for signing - the editor page with annotated descriptions

  1. Use the Add Files button to upload the document you want to bulk send for signatures.
  2. Unlike Templates and Template Links, with Bulk Sign documents, you’ll want to add the tags first. This is so you can pre-populate text tags from the CSV file listing your signers. Drag and drop the tags meant for the bulk signers and then open the tag settings using the cog icon above a selected tag. When you open the settings, change the name to something easily recognizable, like Name_1 or Position_1, for e.g.

changing bulk sign tags for pre-populated informationAUTOFILL: You can autofill certain tags on a Bulk Sign document for each individual recipient by adding additional columns other than the Name and Email columns in your Bulk Sign CSV file. For example, if you had a name field on a document that you wanted to autofill for each recipient, this is what you would do. First, put a Text Tag on the name field, and check the name of the tag. You can change the name of the tag to something more recognizable, like Name_1. Then add a column in your CSV file, and make its name match the tag’s name. Under this column, add in the appropriate information for each recipient to autofill the tag. In our example (see picture below), under the Name_1 column, for the recipient John, we’d put John. Once the document is bulk sent, John will be able to open the document, with the specified text tag automatically filled in with his first name.

  1. Once your tags are in place and renamed, open up a Google Sheets or Excel spreadsheet to create your CSV list. In the first rows, add Name, Email, and any tag names that you want to pre-populate. Then in the following rows, enter the signer information. The name and email are the only columns that are mandatory. The example below gives you an idea of what can be done with the Bulk Sign CSV file.

CSV file for Bulk Sign documents for signing

  1. Once you’re finished constructing your signers list, click on Edit next to recipients in the Editor and when prompted, import the CSV file to your Bulk Signer List recipient by using the Import Bulk List button and selecting the CSV from your computer.

Edit the signer list by importing your CSV file for bulk sign

  1. Once the CSV is imported, you’ll see a second window with the signer information plus any pre-populated tags you want for them. You can edit any of the information by simply selecting it in the window. When you’re finished click the Finish Import button and then Save.   Finalize your signer list before completing the import for your bulk send documents for signing
  2. When you’re finished adding your signers, you can finally send off the document by selecting the Bulk Send document in the top right. Just review the document first before sending, and make sure that everything is correct and to your liking!

Now that it’s sent, each person on the signer list will get a document to sign that’s separate from all the other signers, but this saves you the trouble of sending out these documents one by one! Each of these documents can be viewed from the Documents page, where you can track and monitor the document status and progress of each one. Try it yourself and bulk send documents for signing today!

Further Reading

Electronically Signing Documents for Yourself
Sign Documents Online as a Recipient
Create Your Default Signature Design for One-Click Signing

Send a Document for Signature

Learn how to send a document for signature in just a few steps so you can begin collecting signatures and closing business deals!

Before you begin, you’ll need two things:

  • A document to send (preferably in PDF format but almost any other file format will work)
  • The names and emails of the signers for that document

How to Create and Send an Electronic Signature Document

In Signority, in the top header, click +New > New Document.


Uploading your files

Begin by uploading the files you wish to add to your esignature document.

  1. Add files by either dragging and dropping it into the grey area or using the Upload From Computer button.

    Note: If you if you have a document that has PDF form fields↗ or anchor text↗, you can select those options first before uploading your document. This will let the system know to upload while searching for those options.

  2. A message will appear when a document is successfully uploaded and will be listed on the panel on the right under Uploaded Files


Click Next in the top right to go to the Recipients page.

Recipients Page

Adding Recipients

  1. On the Recipients page, select Add Recipients and enter their names and email addresses, or if you will be a signer, you can simply select Add Me to add yourself.
  2. [Optional]  You can also create a signing order by selecting the Signing Order checkbox and reordering the recipients by either dragging them or typing in their order number. This allows you to create a sequence for your signers and further customize the workflow to fit your needs.
Adjust the Basic Recipient Settings

On the right panel, you will see general settings for the recipients. You can change the recipients notification language, customize the invitation email, adjust the recipient reminder settings, and enable page view evidence.

Click Next to go to the Editor.

Design your Document in the Document Editor

Adding Tags
  1. On the left of the Editor page, select the recipient you wish to add tags for and then drag and drop tags onto the document. Click here to get an overview of the types of tags and what they do.
  2. Modifying a tag:
    1. Select the tag you wish to change
    2. On the actions menu that appears above the tag, you can select the gear icon to open the tags settings (tag font size, making a tag optional) or select the drop down menu with the recipients name to change recipients. The tags will change color to indicate different assigned signers.

      Note:
      Once you change the recipient for tag, any new tags you add will be assigned to them as well. You will need to change the recipient again on the left of the Editor if you wish to add tags for a different recipient. You can find more information on assigning tags here.

    See how to add tags and assign them to the right signers
Modifying the Documents Settings
  1. To make changes to the documents files you can select Edit next to the Files on the left panel.
    1. To make changes to the documents settings such as the documents title, invitation email, notifications & expiration, or signer views, select Edit next to Settings on the left panel.
    2. To modify the recipients list, click Edit next to Recipients on the left panel.

Sending the Document

  1. Once you are finished designing the document, click Send in the top right of the header.
    Note: If you have digital signatures enabled for your account, you will be prompted to select which signature option you would like used on this document.
  2. When it’s successfully sent, you will be taken to a Congratulations page to confirm that it was sent properly.

Congratulations on sending a document with Signority!

If you need more information, check out our video below and get a step by step on how to create electronic signature documents from scratch.


Further Reading

Learn how to set up templates
Learn how to electronically sign a document for yourself